-Dark.png?width=250&height=127&name=CS-Coaching%20Systems%20Logo-Alt%20Version(1)-Dark.png)
Overview
The Enrollments Grid gives you a single view of every course enrollment across all students in your organization. Rather than looking at one student at a time, you can see all enrollments — for every student and every course — in one place.
This is different from the Students Grid, which organizes information by student. Use the Enrollments Grid when you want to work across enrollments (for example, finding every student scheduled for a particular course), and use the Students Grid when you want to start from a specific student.
Where to find it
The Enrollments Grid is accessible from the sidebar. Selecting it opens the grid shown below.
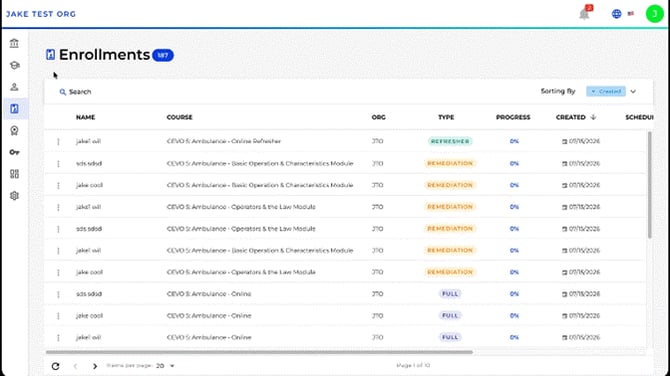
The Enrollments Grid, with search, sort, and column headers visible at the top.
Understanding the grid columns
Each row in the grid represents a single enrollment. The columns are:
|
Column |
What it shows |
|
Name |
The enrolled student's name. |
|
Course |
The specific course or module the student is enrolled in. |
|
Org |
The organization the enrollment belongs to. |
|
Type |
The enrollment type — for example Full, Refresher, or Remediation. |
|
Progress |
The student's completion percentage for that course. Selecting this value opens the student's record on the Courses tab. |
|
Created |
The date the enrollment was created. |
|
Scheduled |
The date the course is scheduled for, if applicable. A calendar icon next to the row flags scheduled enrollments. |
Identifying scheduled courses
Some enrollments are tied to a specific scheduled date rather than being available for completion right away. You can identify these in two ways:
- The calendar icon appears alongside enrollments that have a scheduled date.
- The Scheduled column shows the actual date the course is scheduled for.
Tip: If the Scheduled column is blank and there's no calendar icon on the row, the enrollment isn't tied to a specific date.
Viewing a student's course details
Selecting the Progress value on any row takes you directly to that student's record, opened to their Courses tab. From there you can see all of that student's enrollments, along with details like registration and payment status.
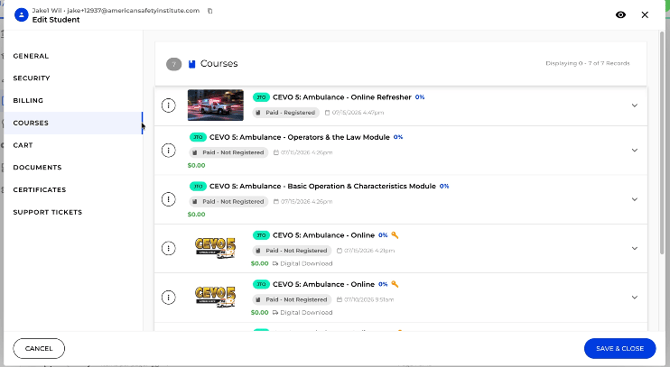
Selecting Progress from the grid opens the student's record on the Courses tab.
This is a quick way to jump from a specific enrollment in the grid to the full context of that student's course history, without needing to search for the student separately.
Searching and sorting the gridThe Enrollments Grid supports both search and sorting so you can quickly narrow down a long list of enrollments:
Tip: Combine search and sort together — for example, search for a course name, then sort the filtered results by Scheduled date to see upcoming sessions in order.
Quick reference
- Enrollments Grid = every enrollment, across all students — for working across enrollments.
- Students Grid = organized by student — for working from a specific student.
- Calendar icon + Scheduled column = how to spot date-specific enrollments.
- Select Progress = jump straight to that student's Courses tab.
- Search + Sort By = narrow and order the grid by any field.
- Search: Use the search box at the top of the grid to find enrollments by student name, course, or other visible details.
- Sort: Use the Sort By control to order the grid by any column — for example by Created date or Progress. Selecting the sort direction toggle reverses the order (ascending/descending).