-Dark.png?width=250&height=127&name=CS-Coaching%20Systems%20Logo-Alt%20Version(1)-Dark.png)
Overview
When assigning a course to a student, you're not limited to making it available right away — you can schedule it to begin on a specific future date instead. This is useful for planning ahead, such as lining up a student's next course before they're ready to start it.
Step 1: Select a student and start the assignment
From the Students Grid, select the student (or students), then use the Assign action. Choose the course type and the specific course as usual.
Step 2: Choose a future date
On the Choose Date step, instead of leaving the assignment as Immediate, use the calendar to pick a future month and date for the course to begin.
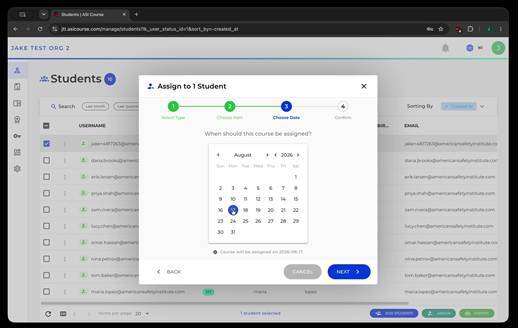
Picking a future date for the course assignment using the calendar.
Step 3: Review and confirm
The confirmation step summarizes the assignment, including the course and the date it's scheduled for, before you finalize it.
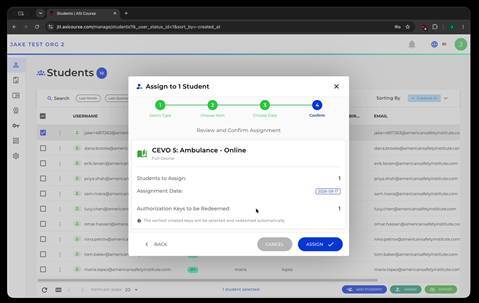
Reviewing and confirming a course assignment scheduled for a future date.
How it looks afterward
Once confirmed, the new enrollment appears on the Enrollments Grid with its Scheduled column populated with the future date, and Progress showing N/A until the assignment date arrives. Hovering over the calendar icon on that row shows a tooltip confirming exactly when the course will be assigned.
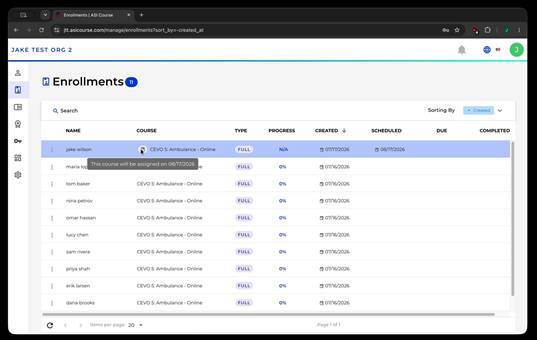
A scheduled enrollment, with a tooltip confirming the date the course will be assigned.
What happens to the Authorization Key
If the course being assigned is a Full Course, the Authorization Key used for it doesn't move straight to Redeemed. Instead, it takes on a Scheduled status until the assignment date arrives.
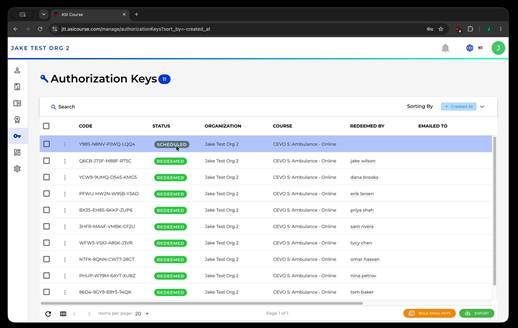
The consumed key shows a Scheduled status in the Key Grid while the assignment is pending.
|
Status |
What it means |
|
Active |
The key is available and hasn't been used yet. |
|
Scheduled |
The key has been reserved for a course assignment that's set to begin on a future date. |
|
Redeemed |
A student has used the key to gain access to a course that's already started. |
Tip: A Scheduled key is already committed to that student and course — it isn't available to assign elsewhere unless the scheduled assignment is undone.
Undoing a scheduled assignment
If a scheduled assignment needs to be undone before it takes effect — for example, if a student leaves before their scheduled course begins — open the row's menu on the Enrollments Grid and select Unschedule.
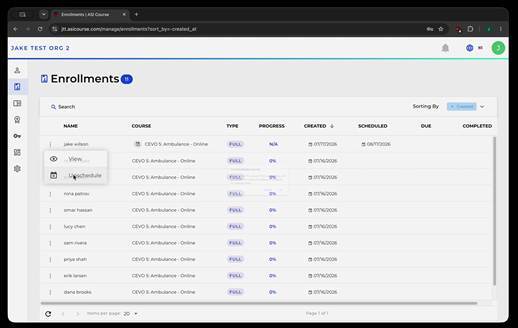
The row menu for a scheduled enrollment, with an Unschedule option.
Unscheduling removes the future assignment, and the Authorization Key that had been reserved for it reverts back to an Active status, freeing it up to be used again.
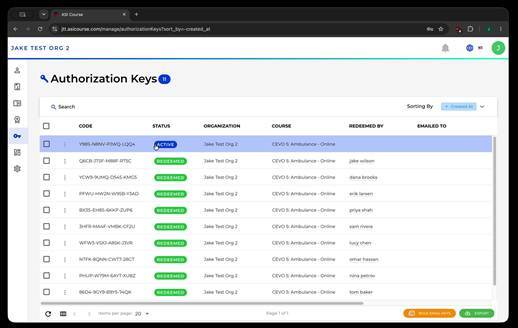
After unscheduling, the key's status returns to Active in the Key Grid.
Quick reference
- On the Choose Date step, pick a future date instead of Immediate to schedule a course.
- Scheduled enrollments show their future date in the Scheduled column, with Progress as N/A until then.
- A Full Course assignment scheduled for the future puts its Authorization Key into a Scheduled status, not Redeemed.
- Use Unschedule from the enrollment's row menu to cancel a future assignment and return its key to Active.